Friday, June 22, 2012

Beast.

Remember when I said that the sewing machine and I are not friends? Well, that's still a very true statement, but we reconciled for just a day and I managed to pound out something truly spectacular for my severely limited abilities.

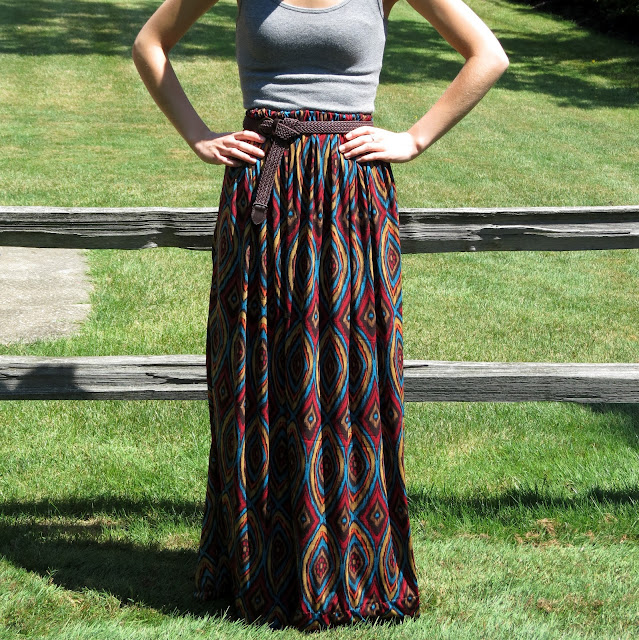
Presenting, the maxi skirt.


Bam. Sewing machine, tackled. Although, to be totally honest all I can really do is press the petal down. Looks impressive though, am I right? Wink.

So, if you're a non-sewer like me and want a super easy DIY maxi skirt, you're in exactly the right place. 

You'll need: Fabric (we used a knit, and bought a yard and a half of it. But if you're taller or shorter, you'll have to measure yourself and do the math on that yourself)
A sewing machine. Any old thing will do, as long as it works.
Matching thread. If you're lucky like us you can raid your grandmother's old stuff.
Pins!
Elastic long enough to go around your high-waist.

Ready? 

1. Fold your fabric right sides together so that you have a long rectangle. Pin the edge opposite the folded side. You're going to make a giant tube.

2. Sew your tube shut. I started by sewing along the white line they nice provided for me, but I sewed another one after that so the white edge wouldn't show through on the good side.


3. Pick your top edge and your hem. We're going to fit the elastic on the top edge. You're going to need enough room so that when you fold over the fabric it's enough to cover the elastic and still be tucked under so that no raw edges show.


4. Don't pin the elastic in though! Just use it to measure how far down you need to pin. If you aren't totally sure what I mean (probably because I'm the worst explainer of sewing things ever) look at the picture below. No elastic, but enough fabric that it'll fit when we put it in later. AND the bottom edge is folded under a bit so when we sew the edge down none of the raw, yucky edge sticks out.


 This is an idea of how to pin it. just along the edge. 


5. Okay. Now, when you sew your seam, you're going to go right along the edge where you folded the fabric under. You're making a hole for the elastic to side through! Sew along almost the entire edge, leaving just an inch or two to pull the elastic through.


6. I didn't take a picture of the elastic step, but I attached a safety pin to the one end of the elastic and worked it through the loop I made for it. Don't forget to hold onto the other end so you don't end up losing it in the middle of your skirt somewhere! When the elastic is through the entire skirt, sew the two ends together to make an elastic circle. Then you can close the hole you left open for the elastic (picture below).


7. Alright. Your top half of the skirt is finished. Time for the hem! Apparently I was inconsistent with my picture taking because I don't have a picture of the first hem I made. For the first hem, you just need to fold a little bit of the fabric over. Really the idea here is to hide the raw edge and keep the material from fraying. The second hem is much more important. This is where you're going to need to measure exactly how long you want your skirt to be. Then fold up the hem and pin it. You can either sew it with the sewing machine or by hand. I would suggest by hand. It'll be a lot harder to see once you've finished.


8. Turn it right side out, and you're all done! Now just wear your amazing maxi skirt and show it off to everyone you know!

The flexibility of a knit maxi skirt. Or, the true personality of myself.


Thursday, June 7, 2012

Jumping

For those of you who know me personally, you know that sewing machines and I are not good friends. My medium is paper, and paper is where I like to stay. However, this summer I've been experimenting a little bit more. Those little owl phone cozies require the use of a sewing machine. The little stinkers. So I figured out the whole shenanigans of how a sewing machine works. Or, at least, I can turn it on and sew a seam. Don't laugh at me yet! Two months ago I wasn't even sure where the 'on' button was, so as you can see, I've made tremendous progress.

Now I'm getting a little daring - probably too daring, to be honest, but I was never one to dip my toes where projects are concerned. It's all or nothing. So now that I'm familiar with the 'on' switch and can sew a straight line and make adorable owl phone cozies...

I'm going to make a quilt!

Whoa, Janelle. Slow down. Are you really ready to tackle a quilt? Probably not, but I'm doing it anyways. Sure, I'll get frustrated. Sure, it probably won't be the most beautiful thing you've ever seen.
And it's not like I'm making a real quilt. Just a t-shirt quilt. So it doesn't have to be perfect. I don't have the patience to make a real one.


I had all of these Houghton shirts sitting around that will never ever be worn again. How many oversized t-shirts do I need? I saved my favorites and tore apart the rest. I'm so excited about this project. Probably I'll hit six billion bumps along the way, but if it turns out at all looking like a quilt, I'll share my secret and let you all know how to make your very own. Bear with me though! This dear blanket of mine probably won't be finished until... well, hopefully before I forget that I cut up my t-shirts. So if you're a patient person and are curious to see how this crazy experiment of mine will turn out, stay tuned! Someday, I'll share the result :)

Wednesday, June 6, 2012

On Rainy Days

I somehow had five days off from work... and it rained the entire time. 
So, I crafted and created and stayed dry.


I'm up to six now! They are so stinking cute. I'm a little biased, I know. But they are adorable.
I especially love these three new guys.


I think the last one is my favorite :)


Monday, June 4, 2012

Earl Grey

I love coffee. 

Somehow, however, I managed to surround myself with people who love tea. Oh, some of them drink coffee too, but there seems to be an unusual amount of tea drinkers in my life. As you can imagine, that makes it awfully challenging to go on a coffee date. 

As a result, I have to think up gift ideas from time to time for these tea lovers of mine.
Since it was a dreary, rainy afternoon, I cooked up this quick DIY treat in honor of those tea drinkers.

The Tea Box

You will need:
one small cardboard box (I got mine for $1 from JoAnn's)
tea bags (well, not the bags but the packages they come in)
glue

1. cut the sides of the tea bags off, open them up, and cut them in half. (I tried this once before and only cut off the backs, but the sealed sides seem to get in the way and make it more difficult to glue down)


2. Arrange the cut tea bags over your box however you choose and glue them in place.
I decided to just cover the top and sides, and left the bottom and sides of the cover blank.


So simple! And such a cute gift for those tea lovers that sneak into your life! 
Definitely fill it with the tea they love best, or even just assortment of all different kinds.

And that's it! Enjoy making and giving :)


Friday, May 25, 2012

Everything is better when it's cozy

It's absolutely true. A cozy sweater is better than not; cozy socks, cozy blankets, cozy mittens and hats (as long as they have style as well), cozy pillows, cozy phone cases...

And cozy mugs! or mug cozies, whichever you prefer.
I found this pattern the other day while I was looking around for something new and different to do; preferably something that wouldn't take up so much time and easy enough for me to figure it out without trying too hard. As it turns out, this is exactly what I was looking for.


It took me just under an hour to finish. I'm guessing that if you're the kind of person that actually knows how to crochet and isn't just winging it, you could get it done in half that time. So extremely easy (trust me! I don't have much experience when it comes to this sort of thing).

And, since I absolutely cannot take credit for this adorable little thing, if you're looking to make one yourself, 
micahmakes.com is exactly where you need to go.


And! This is my favorite part, I think. If you have friends or family that love coffee or tea (and I'm guessing you probably do), it's the perfect little gift. So great.

Saturday, May 19, 2012

Testing the Waters

Dear Reader,

I have a secret.

I want to start an Etsy.
A really bold move, I know. But it's true. 
I would love it so much.

So this is the start of what I hope turns into a little crafty business. Eek! I'm so excited :)

This is what I've been spending my week on, perfecting and tweaking. And (I think) it's absolutely perfected! I'm so excited to share this with you all!


Owl Phone Cozies!

For those of you who know me, you know that I'm almost obsessed with owls. If it made any sense at all to own one, I absolutely would. But since it doesn't, I had to settle for creating one. After several different little mini-models I finally think I've found the one I want! There's even a little pocket on the back side so you can slip in your headphones, license, etc. The poor middle guy there was all sewed up before I realized it would be smart to add a button on the inside so you can keep your iPod or phone all snug and secure. I'll probably give him a snap or something.


And there it is! Big enough to fit an iPod touch, phone, camera, etc. And roomy enough that a pair of headphones in the back pocket doesn't really make a difference.

So. My fingers and toes are all crossed. Here we go!